
Top 5 Vista Tweaks: how To Increase Internet Speed

They say that life’s most difficult tribulations also result in the greatest insights and wisdom once you’re through it. Let’s just say that purchasing a brand new laptop with Vista installed on it was one of my greatest tribulations to date.
So I’m taking this opportunity to share the wisdom that I’ve gained from that experience so that, possibly, I can save the next poor soul the trouble and heartache that I had to suffer through.
Am I being over-dramatic? Maybe. But what you have to understand is that at the very center of my livelihood is the Internet. I earn income, learn and unwind all on the Internet. When I lose that connection to the virtual world – I’m not a happy camper.
Rewind several months to the day when I purchased a new, shiny Sony Vaio laptop. I brought it home, excitedly opened up the box and turned it on, expecting the brand new laptop with a build-in wireless ethernet card to instantly sense my home network and connect almost completely automatically. Unfortunately, it sensed nothing. Many hours later, after an unmentionable amount of coffee consumed, I finally had my new Vista laptop on the Internet and screaming.
To save MUO readers out there who find themselves in this situation countless hours of aggravation, I’d like to offer the most important lessons I learned about Vista during this ordeal. Earlier, Aseem offered applications you can install that will improve your PC performance. However, I’d like to present the top five ways you can tweak Vista itself to get your Internet connection working, and increase your overall Internet speed.
The Most Important Vista Internet Speed Tweaks – Once You Can Connect
New technology is fabulous when it works, but I was quite disgusted to learn that Microsoft implemented IPv6 on Vista and upon install it is set as the default. The silly part is that it simply doesn’t work well with devices that still utilize the IPv4 protocol – and to assume that most home networks are fully upgraded to the IPv6 protocol is a faulty approach to setting defaults.Many people upgrade their PCs and laptops long before they consider replacing that old outdated router that’s been sitting in the basement for five years and still works perfectly. So, when they bring home that shiny new laptop with Vista installed, guess what – the laptop and the router simply refuse to talk.
So, if you’re unlucky enough to find yourself in this situation – the very first thing you should do before we can even get started speeding up the Internet, is to disable IPv6 so that you can at least get on the Internet in the first place. Here’s how it works.
First, go to Start -> Network -> Network and Sharing Center, and then click on “Manage Network Connections.”


Vista Connection Tweak #2 – Autotuning
This is another case where the cutting edge technological advances being enabled on Microsoft’s operating system by default is a recipe for disaster for users who have older networks and older network devices (specifically older routers). Vista comes installed and enabled with something called “Receive Window Auto-Tuning.”On advanced networks, it’s actually a pretty cool technology where the transfer of data is monitored and Vista automatically “tunes” the TCP window field to optimize packet transfer. Older routers simply do not “play nice” when it comes to that kind of window resizing. This spells trouble for home users who don’t know the difference between a packet of data and a packet of sugar. What was Microsoft thinking?
Luckily – there’s a way for you, the home user, to turn this default feature off as well. First, click on “Start” and type “cmd” and right-click on the command icon. You’ll see the following window.


Vista Tweak #3 To Increase Internet Speed – Take Back Your Bandwidth
Another unnecessary default setting that Vista (and actually XP as well) comes with is a 20% “reserve” of your available bandwidth in order to accommodate certain applications like Windows Update. This tweak is a pretty common one most old-school users of XP already know – it’s not at all detrimental and you can immediately gain 20% of your bandwidth back, increasing Internet performance significantly.This is called the QoS Reserve Bandwidth Limit, and to reduce this on any version of Vista you need to edit the registry.
Go to Start and type “regedit“. You may have to deal with the UAC, unless you’ve read Sharninder’s advice on how to speed up your Vista by turning it off! In Regedit, navigate to “HKEY_LOCAL_MACHINE\SOFTWARE\Policies\Microsoft\Windows”

Vista Tweak #4 – Modify Your Browser For Optimum Speed
Believe it or not, not only is your Vista operating system not configured by default to blaze the Internet as fast as possible, but neither is your Internet browser! These instructions include how to increase your browsing speed on Firefox and IE.First, in Firefox type, “about:config” into the address bar (and ignore any warnings). In the filter field, type “network” and scroll down to “network.http.pipelining” and set it to TRUE, and set “network.http.pipelining.maxrequests” from 4 to anything from 8 to 12.


Vista Tweak #5 – Increase DNS Cache
This tweak is one that anyone should do anyway, as it can significantly save time while surfing the web, especially if you tend to visit the same sites often. What the DNS cache does is store information retrieved from the nameservers (IP information) so that the next time you visit the same site, your browser doesn’t have to waste time retrieving the same information from the DNS servers.You can optimize this by increasing the size of your DNS cache. This is another registry edit – so go back in there (Start and type “regedit“) and navigate to “HKEY_LOCAL_MACHINE\SYSTEM\CurrentControlSet\Services\Dnscache\Parameters” and then right click on the white space at the right and add four DWORD values: CacheHashTableBucketSize, CacheHashTableSize, MaxCacheEntryTtlLimit and MaxSOACacheEntryTtlLimit.

How To Open An Unknown File
Not knowing how to open a file!
OpenWith.org provides a free desktop utility that integrates itself with your shell context menu. Whenever you come across a file type you don’t recognise simply right click on the file and select "OpenWith.Org - How do I Open This?"
OpenWith.Org Desktop Application will open and display a list of applications installed on your computer which can open the file. If it doesn’t detect any supported applications on your system it will provide you with download links for required applications (freeware).

Its verys simple to use and really a good tool for those who doesn’t know how to open unknown files.
how to Shutdown your PC remotely using Twitter and TweetMyPC.


- Shutdown
- Restart
- Logoff
25 (Most Wanted) Tips For iPhone 3G
-
How to Disable iPhone 3G GPRS or Edge Connection
Tap "Setting – General – Network – Cellular Data Network". In the “APN, Username and Password" field, simply type in some words so iPhone will not pass the correct values to service providers. Restart your iPhone if necessary.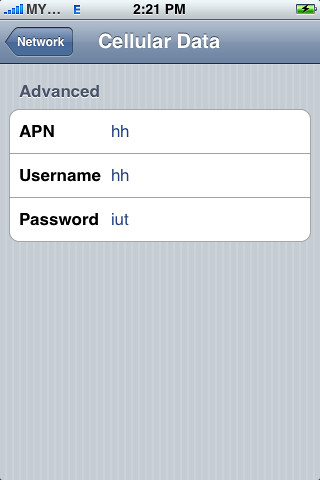
-
How to Set Content Restriction
You can set restrictions for iPod content for the use of some applications on iPhone. For example, parents can restrict explicit music from being seen on playlists, or turn off YouTube access entirely.
Just go to “General – Restrictions” then tap Enable Restrictions and enter a four-digit passcode to restrict your content.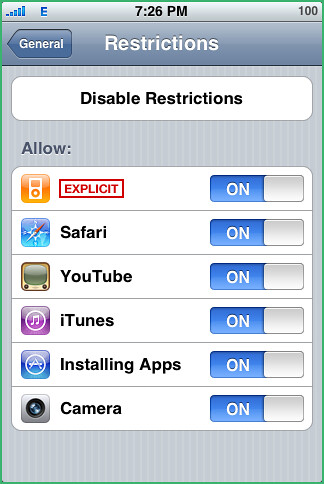
-
How to Customize iPhone Wallpaper as Google Calendar and Notes
gCalWall Lite enables users to add their upcoming Google Calendar appointments to their home/unlock screens.
-
How to Train your iPhone to Learn New Words
You can train your phone to “remember” words if you type them repeatedly, but this tutorial will teach you a better way to train your iPhone to learn new words on the fly.
-
How to Select Other Domain Name Endings
When you type a website URL in the address bar, you can now hold down the ".com" button to get a selection of other domain name endings and tap on any of the endings to insert them in the address bar. [via tuaw]
-
How to Take Screen Shot
Hold the "home" button, then hit the "power/sleep" button, the screen will momentarily flash, and the iPhone’s current screen contents will be saved to the Camera Roll.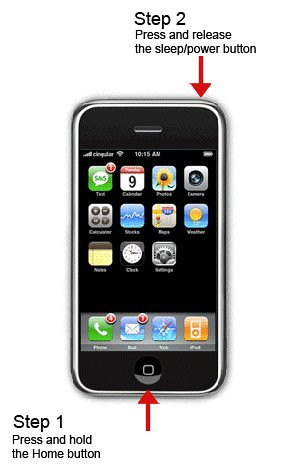
-
How to Hide SMS Preview
With Show SMS Preview disabled you will only get a generic "New Text Message".
Go to "General > Passcode Lock" and enter a 4-digit passcode. After that disable "Show SMS Preview".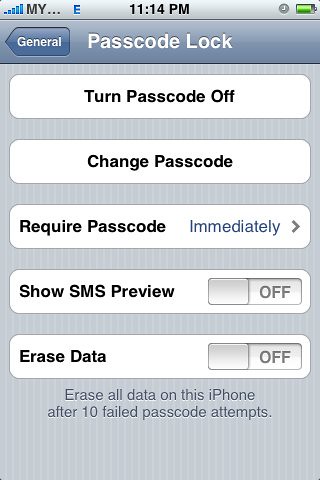
-
How to Increase the Volume of the Ringer
Your iPhone’s ringer volume issue can be resolved by using a custom ringtone rather than ringtones currently available on the iPhone.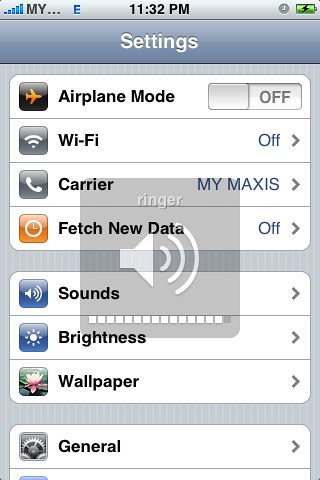
-
How to Save Images in Safari and Mail
Just touch and hold an image in Safari or Mai, an action sheet will be presented to enable you to save the image. The image will get stored in the “Saved Photos” library of the Photos app.
-
How to Insert Extra Punctuation Keys
Touch and hold the punctuation key and you get a set of additional keys to choose from.
-
How to Force Quit An App
Have you ever been using an app and it’s become completely frozen? You can actually apply a force quit on it by pressing the Home button for at least six seconds.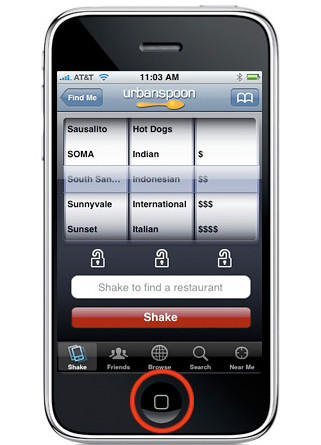
-
How to Switch Punctuation Keys to Alphabet Keys Quickly
Mode changes in between the punctuation keys and alphabet keys are pretty annoying. To solve it, just press the “.?123″ key, but don’t lift your finger as the punctuation layout appears. Slide your finger a half inch onto the period or comma key, and release. The ABC layout returns automatically.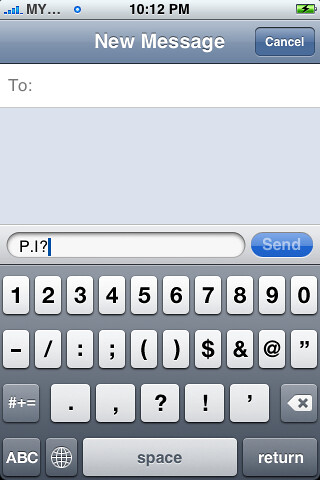
-
How to Fast Forward/Rewind Music & Video
Press and hold the skip forward/back arrows to fast forward or rewind rather than skip tracks. Also, press on the album art to manually FF/rewind.
-
How to Access iPod Controls or Phone Favorites Instantly
Go to "Settings – General – Home Button". You can customize by double-clicking the Home Button goes to Home, Phone Favorites or iPod Controls.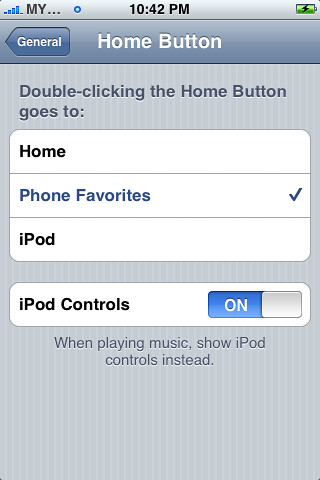
-
How to Maximize iPhone Battery Life
Here’s how to live with the iPhone’s battery life while using it a whole lot.
-
How to Erase iPhone Data Thoroughly
A method that should wipe out almost all remnants of your personal data.
-
How to Backup Your iPhone Contacts
A neat application dubbed IDrive Lite that allows you to backup, share and restore all your iPhone contacts completely free of charge if you’ve updated your iPhone software to 2.0.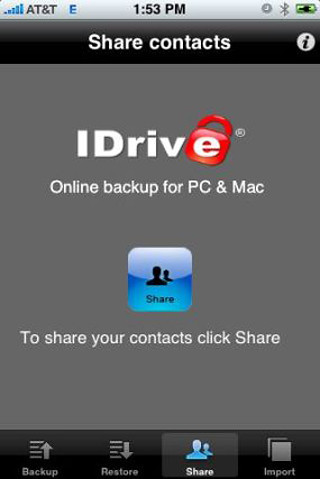
-
How to Design iPhone Themes
If you’re bored with your default iPhone theme and plan to get more funky on it, you can visit iPhone Theme Generator and grab your own customized theme. It also provides a very good guide on how to install the theme into your iPhone.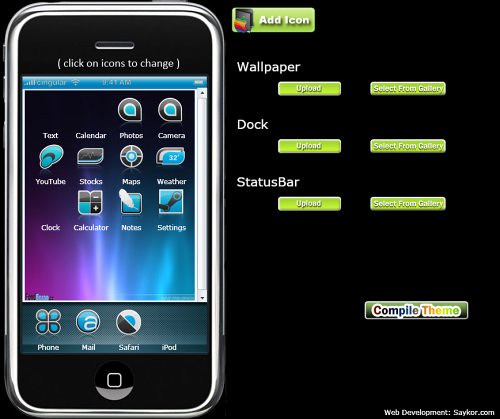
-
How to Access the Scientific Calculator
To access the scientific calculator, just rotate your iphone sideways into landscape orientation while using the calculator.
-
How to Share Your iPhone Apps with Others
Melvin Rivera has a great step by step set up, so if you are a multiple iPhone family then you may want to head on over and check it out.
-
How to Use iPhone as External Disk
DiskAid is a tool (freeware) for PC and Mac which enables to use your iPhone or iPod Touch as external Disk. With DiskAid you can transfer files and folders via USB between your device and your Computer.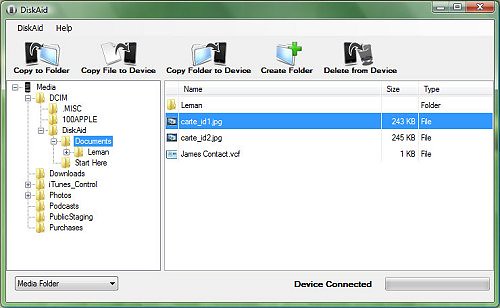
-
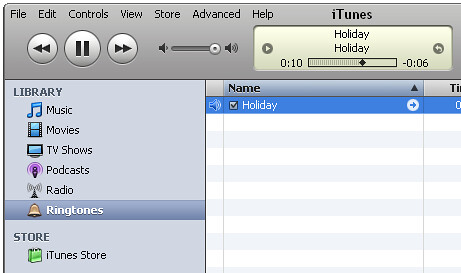
How to Create Free iPhone Ringtones Using iTunes in Windows
A few steps you can actually convert a DRM-free song into a ringtone using only iTunes in Windows. -
How to Convert Videos for Your iPhone
An useful resource for converting videos online as well as off. This tutorial also teaches you on how to copy videos to your iTunes and iPhone.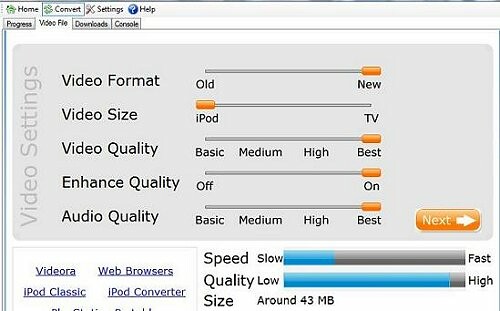
-
How to Sync An iPhone with Multiple Computers
This tutorial allows you to add music/videos/podcasts from multiple machines.
-
How to Migrate Cell Phone Data to iPhone 3G
Fone2Phone can help you migrate contacts, events, tasks, notes, bookmarks, photos, music and movies to the iPhone 3G.
18 cool things Windows 7 does that Vista doesn't

2. Jumplists

TIME-SAVER: The Jumplist for Windows Explorer – pretty useful

START HERE: A Jumplist integrated into the Start Menu
3. A step forward in previewing

PREVIEW PLUS: A smaller preview, along with a full-size 'peek' with the ability to close the window
4. Snap into place
5. XP Mode
6. An easier and quicker way to adjust multiple displays
7. A personalised Stage for your device
8. (Almost) eliminate the notification area!

QUIETER: Stop all those notifications – but you might want to keep the clock there
9. Problem Steps Recorder

A PROBLEM HALVED: Simple, yet so effective. Send this to tech savvy friends or even manufacturers

UP CLOSE: A sleek new magnifier that follows your cursor, without decreasing your workspace
11. A new way to preview your music files

MUSIC PREVIEW: The new preview is simple – and loads up very quickly
12. Homegroup Networking
13. Stream Music directly to another computer
14. Action Center
15. Pin just about anything to the new Windows Taskbar
17. Native ISO Burner

FINALLY: Burning an ISO file has never been so easy
18. Native calibration tools
If you tend to hook up your computer to an HDTV or care about getting the highest quality from your monitor, then the in-built basic and easy-to-use calibration tools built into Windows 7 will please you.
how to Make Firefox 3+ Faster ?

Now these should make firefox 3 faster in web browsing through the above settings that increased numbers of simultaneous connections, the activation of pipeling independent confirmation of its support from the server, disabling IPv6, the reduction in the time data to begin the rendering of pages, and more.* Network.dns.disableIPv6: true
* Network.http.max-connections: 48
* Network.http.max-connections-per-server: 24
* Network.http.max-persistent-connections-per-proxy: 12
* Network.http.pipelining.firstrequest: true
* Network.http.pipelining: true
* Network.http.pipelining.maxrequests: 32
* Network.http.proxy.pipelining: true
* Nglayout.initialpaint.delay: 0
* Network.http.request.max-start-delay: 5
* Extensions.checkCompatibility: false
how to Change STARTUP and SHUTDOWN sounds in XP
Have you ever felt bugged-up with the Start-up and Shutdown jingle of your Windows XP or Vista ? If yes, here is the solution, now you use any of your favorite voice or music or dialogue as your PC’s shutdown and start up.
It’s a simple 4 step process.
Step 1.
Choose the track which you want to play at start-up and shutdown jingles,
Limitations are
* It should be in .WAV format.
* The size of file should not be large, prefer keeping them within in 1 Mb, otherwise your startup will take a bit longer.
If the file you want to make your start-up or shutdown is not in .WAV format, you can easily convert them using Jet Audio 7, or any other converter.
Step 2.
Now rename these files as “Windows XP Startup.WAV” and “Windows XP Shutdown.WAV” respectively.
Step 3.
Now Go to “C:\WINDOWS\MEDIA”, here you will find files “Windows XP Startup.WAV” and “Windows XP Shutdown.WAV”, move them to some other locations, this step is required for, in case you need to revert back these sounds, else you can ignore this step.
Step 4.
Now the files you have chosen and renamed, just copy-paste or cut paste them in “C:\WINDOWS\MEDIA”, here you go, now you can enjoy the newStart-up and shutdown.
XP Tips & TriCKS
Many of our Microsoft Monday posts over the last several months have focused on Windows Vista — after all, it is the latest operating system from Microsoft. While it’s the “latest and greatest” as they say, we know many of you still use and prefer Windows XP. Today we thought we’d spend some time going over a few Windows XP tips. Some of the tips you may be well familiar with while others will be completely new to you. This will be the first in a two part series, so stay tuned for the 2nd edition.
Many of these tricks use the Windows Registry Editor, which you can start by pressing WinKey+R and type regedit into the box.
Note: Some of these tips may work in Vista, but we have not tested them in Vista.
–Hide a folder without any software (must read)–
I would have to put this trick up near the top of my favorites list.First remove the folder's namefollowing the given steps:
- Right-click on folder, and choose the Rename option. Delete all of the text.
- Hold down the Alt key and type 0160 (note: you shouldn’t see any text being typed). That will essentially make a space character the file name. Press Enter to save the results.
- You can repeat this for several folders, but there is one catch. You probably know that you can’t have multiple icons in the same folder (or on the desktop) with the same name. To get around that for a second shortcut you can do Alt+0160 + Alt+0160. That will essentially create two spaces for the filename, and for a third shortcut you could do Alt+0160 + Alt+0160 + Alt+0160. As you can see this would get tedious rather quickly, but for a handful of shortcuts it is pretty nice.
Now hide it's icon by the given steps:
1:Right click on the folder .open properties -> customize -> change icon2:There would be some blank spaces in the given icons.Choose it as your icon.
–Rename the Recycle Bin–
Want to rename the Recycle Bin? Here’s what you gotta do:- Run the Registry Editor and navigate to HKEY_CLASSES_ROOT\ CLSID\ {645FF040-5081-101B-9F08-00AA002F954E}
- Double-click on (Default), and change the name of the Recycle Bin. Close the Registry, and press F5 on the desktop to refresh the icon.
–Network Sharing–
When you’re looking at files on a network drive you might have noticed that it can take a rather long time (up to 30 seconds). What happens is XP checks to see if the other PC has any scheduled tasks. You can disable that by:- Run the Registry Editor and navigate to HKEY_LOCAL_Machine\Software\Microsoft\Windows\ CurrentVersion\Explorer\RemoteComputer\NameSpace.
- Delete the {D6277990-4C6A-11CF-8D87-00AA0060F5BF} key. Close the Registry.
- While you’re there you can also delete the {2227A280-3AEA-1069-A2DE-08002B30309D} key if you don’t use printer sharing.
- Reboot your computer.
–Excessive Printing–
This probably isn’t for home users, but for all the people out there that do a lot or printing this is something you should consider doing. By tweaking this Registry setting the printing process will have a higher priority. Here’s the details:- Run the Registry Editor and navigate to HKEY_LOCAL_MACHING\SYSTEM\CurrentControlSet\Control\Print.
- Create a new DWORD called SpoolerPriority, and give it a value of 1.
- Reboot your computer.
–Disable Last Access Time Stamp–
This small little tweak is a great one, because it disables a feature that most people never even use. By default Windows always keeps track of the “Last Accessed” date in the file or folder’s properties. If you’re constantly opening and closing files you’re causing some additional work for Windows since it has to update the last accessed date each time. If you never use that property feel free to disable it:- Run the Registry Editor and navigate to HKEY_LOCAL_MACINE\SYSTEM\CurrentControlSet\Control\ FileSystem.
- Create a new DWORD called NtfsDisableLastAccessUpdate, and give it a value of 1.
- Reboot your computer.
How To Hide Files In A Calculator!
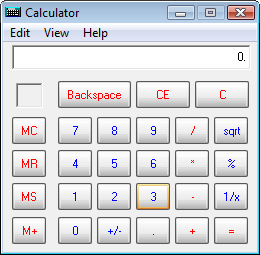
 The default code/ pin for the safe is ‘123’. So, to unlock you need to type ‘123’ in the calculator and press on ‘MS’, now the calculator will enter into safe mode. Here you can change the default pin if you want by clicking on ‘New pin’.
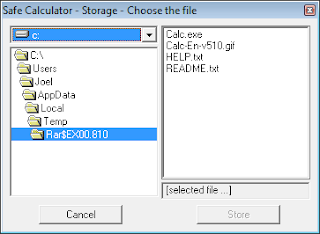
Now click on ‘+’ and then ‘=’ to confirm and enter into the safe to browse and choose the files you want to hide. Click on ‘Store’ once you’re done.
Download Safe Calculator
how to Increase InterNet Speed Using Notepad
1.
Open Notepad.
2.
Copy the following code to the Notepad.
[HKEY_LOCAL_MACHINE\SYSTEM\CurrentControlSet\Services\Tcpip\Parameters]
"SackOpts"=dword:00000001
"TcpWindowSize"=dword:0005ae4c
"Tcp1323Opts"=dword:00000003
"DefaultTTL"=dword:00000040
"EnablePMTUBHDetect"=dword:00000000
"EnablePMTUDiscovery"=dword:00000001
"GlobalMaxTcpWindowSize"=dword:0005ae4c
3.
Save the file as NetSpeed.reg or what ever name you want but the extension should be .reg.
4.
If you run the file means it asks for "Do you want to add the following entry to the registry"
5.
Press Yes
6.
Reboot your PC.
7.
Feel the difference....
10 Unknown secret gtalk emoticons

I thought that they were the only Some smileys availabe for gtalk.But now i got to know that i was wrong.Gtalk has many Unknown/hidden emoticons and smileys that are not out to public.The curiosity in my mind awake, when i came to know about this.I have started to explore them and here are 10 such hidden emoticons that i found.
 Cowbell | +/’\ |
 Crab | V.v.V |
 Devil | }:-) |
 Equal sad | =( |
 Equal slant | =/ |
 Equal tongue | =P |
 Mustache | :{ |
 Broken Heart | |
 Wince | >.< |
 Nose tongue | :-P |
I'll try to Find the rest of these emoticons and will ist them here.Wait for them.
Wait for the hidden secret smileys of Gtalk !